


What Makes the Perfect Lash Set?

Table of Contents
What Defines the Perfect Lash Set?
As we’re having our daily social media scroll, it's common to pause and admire those lash sets that represent our professional aspirations. The quest for 'perfection' in our work is all we aspire for, but what exactly makes a lash set technically impeccable?
As pioneers in the UK for hosting an eyelash extension championship (Lash Battle) and being among the top training academies, we have a deep understanding of the fine details that constitute a technically perfect lash set - and we’d love to share it with our US London Lashers too! So, what do judges and lash trainers asses when they’re looking at your lash extensions set?

The Aesthetics of a ‘Perfect’ Lash Set
Top Line
The top line refers to the upper edge of the eyelash extensions, as the name suggests. Current trends like the Kim K style with its distinct wispy top line, or the bold, spiky finish of wet look lashes are all the rage. However, when Russian Volume lashes emerged, a key feature was their remarkably even top line.
When being assessed, we scrutinize this aspect to ensure flawless alignment. For tips on achieving a super even tip lash line, check out our blog post about working with lash layers. In some competitions, there are actually wispy or Kim K styling categories that still demand an even top line but with noticeable spikes.

Direction
The direction of your extensions is crucial. Any deviation, such as leaning to the side, and points are deducted! For styles like Extreme Cat or Fox, the lashes may sweep outward towards the corners, which is acceptable as it enhances the overall appearance. The goal is uniform directionality, so as long as all lashes point in the right direction, you're good!
Styling
Did you tailor the style to your model's facial structure, eye size, and spacing? If not, it could cost you points. Eyelash extensions should accentuate a client's natural beauty, hence the variety of styles. If you want to know what lash style suits each eye shape, take a look at our eye shapes blog post.
Here’s a basic guideline that you can use:
- Wide-set eyes: Dolly style
- Proportional: Squirrel style
- Close-set: Cat style
Our rule of thumb: when in doubt, choose squirrel. This style complements almost everyone as it follows the length of your client's natural lashes, with the longest section under the brow arch.

Coverage
Aim for at least 80% coverage, or 100% for competition sets (excluding tiny lashes). Achieving this, especially in live competitions, can be challenging, but can also be a blessing as you can take all day if you need to. Online competitions offer more flexibility, but require patient models, so make sure that you’re super nice to your models and they’re comfortable every step of the way.
Overall Look
Most importantly, does the lash set look good? Are there any issues with length, gaps, or styling? You also need to ensure the model's eyes aren't irritated, as bloodshot eyes can detract from the appearance. To help with this, during the treatment, ensure that the client's eyes remain closed and at the end, use a fan to eliminate any fumes.

Symmetry
Both eyes should mirror each other in terms of lash length and placement. One thing that is incredibly helpful for achieving a symmetrical lash set is by drawing a lash map on your eyepatches. Whether you're about to perform your first set or your thousandth, this applies to you!
Achieving symmetry can be tricky with clients having different eye shapes or lash growth patterns. It’s tricky, but not impossible! Adjusting curls and lengths creatively can address these challenges, you may need to be more creative with your lengths and curls. For example, a tighter curl such as CC on straight lashes will work, and a C curl on lashes that grow upwards will suit perfectly. With practice, you can master this technique! Just to be on the safe side though, if you are preparing for an assessment or competition, choose a friend with the easiest eyelashes to work with.

The Technical Aspects of a Perfect Lash Set
Stickies
In the UK, ‘stickies’ is a term that describes two lashes sticking together, which typically happens due to poor isolation or the use of excessive lash adhesive. If you want to learn more about stickies and how to avoid them, check out this blog post!
All in all, any stickies are unacceptable. They can damage your clients’ lashes, harm your reputation, and actually impact the industry as the question “do lash extensions damage lashes”, stems directly from experiences with stickies. With advanced isolation and attachment techniques, there's now no excuse for stickies.
Attachment
Lash extensions should be seamlessly attached to the natural lash without any misalignment or discomfort. It's important that each individual lash extension is attached flush with the natural lash, without any crisscrossing or lifted bases, to prevent discomfort or stickies.

Clean Work
How much glue has been used? The amount of glue used is critical. We really want to avoid clumps of glue in the lash line, since they are unappealing and can result in stickies. You'll also want to ensure that there is no shock polymerization in your set, as it will result in point deductions.
Length
You may be thinking "Why isn't length included in the aesthetics section?" Well, the reason is that excessively long lash extensions can cause damage. As a general rule, the maximum safe extension length is typically 3mm longer than the natural lash. If you are adding spikes throughout a Kim K set, those spikes are usually longer than the natural lash length by 5-6mm.
So, how can you protect the natural lashes? To protect them, you can either use closed fans or flat lashes with spikes. If you want to use closed fans, it's better to go for thinner lashes. Alternatively, flat lashes are a great option as they are much lighter than the standard classic lash - with flat lashes, you can safely use a 0.25 flat lash for a fan, which weighs about the same as a 0.15 classic lash.

Thickness/Weight
Choose lash thickness wisely! Are the lashes you’ve chosen safe for your client’s natural lashes? For instance, using 0.10s for a 4D set is unsafe and will result in point deductions.
When participating in competitions, selecting the fan size is not usually a concern since you will be competing in a specific category. However, when submitting work for a course, it is recommended to send sets with 3-4D at the most. This helps us to better assess the attachment skill.
If you are submitting work in the mega-volume category, please note that anything thicker than 0.05 will result in point deductions. However, you can use super fine lashes for mega volume to safely create thick, dark, and full sets for clients who desire them. For instance, a 15D fan in 0.03 can be used without causing any damage.

Distance from the Eyelid
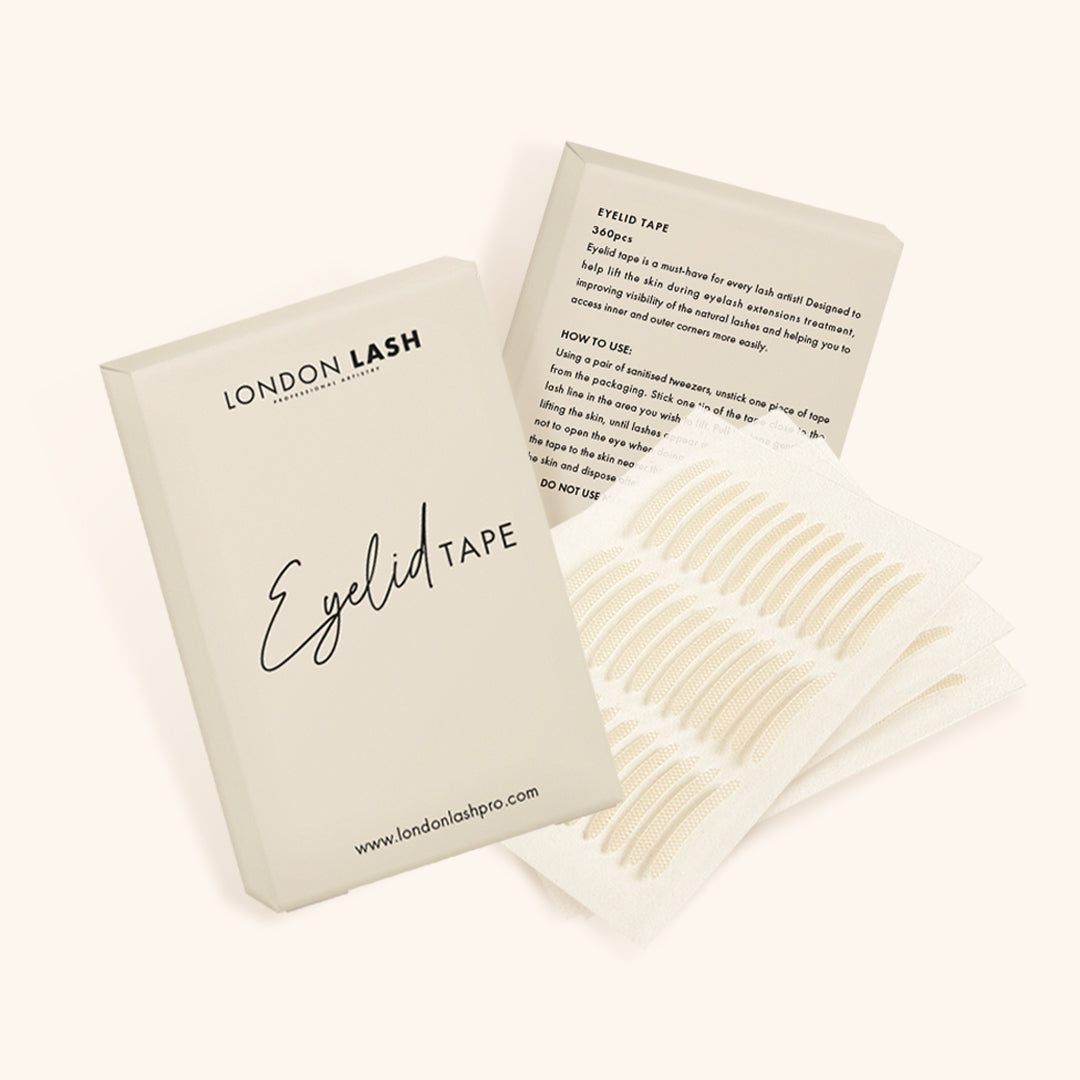
Ideal attachment is 0.5mm from the eyelid at the corners and 1mm along the lash line. When you're a beginner, dealing with attachment can be difficult, but with practice, you can easily overcome this challenge. If you find that your lashes are too far away from the eyelid, try using tape to delicately lift the eyelid as this will allow you to access the lashes more easily.
Avoiding direct contact with the skin is crucial to prevent allergic reactions. If eyelash extensions are placed too close to the eyelid, it can cause discomfort and increase the risk of an allergic reaction. Therefore, the glue should never touch the skin!
Fan Fluffiness
The focus here is on the uniformity and evenness of the fans, which contributes to the fullness of the set. It's important to note that whether you choose narrow or wide fans for your lashes, we won't be harsh in our judgment. Both types have their own merits when used correctly. What we do focus on, however, is the distance between each lash in the fan and ensuring that the fans themselves are evenly spaced. The more even your fans, the fuller your set will look!

Inner and Outer Corners
You must ensure complete coverage at the corners, maintaining the correct distance. Here are two things we suggest doing:
- Using tape to gently lift the eyelid will help to access these lashes.
- Starting with the outer corners can prevent issues like shock polymerization as one of the most frequent causes of shock polymerization is when a client's eyes start watering towards the end of the application. By applying the outer corners first, the glue gets more time to dry if the lashes do start to leak, helping to avoid shock polymerization.

We hope this guide was helpful! Now you know of all the elements that contribute to a perfect set of eyelash extensions, and now it’s your turn to put these into practice! For more educational tips and tricks, keep up with our regular blog posts and check out our Instagram.
Check out these featured products