Quick Top Lash Placement Tips
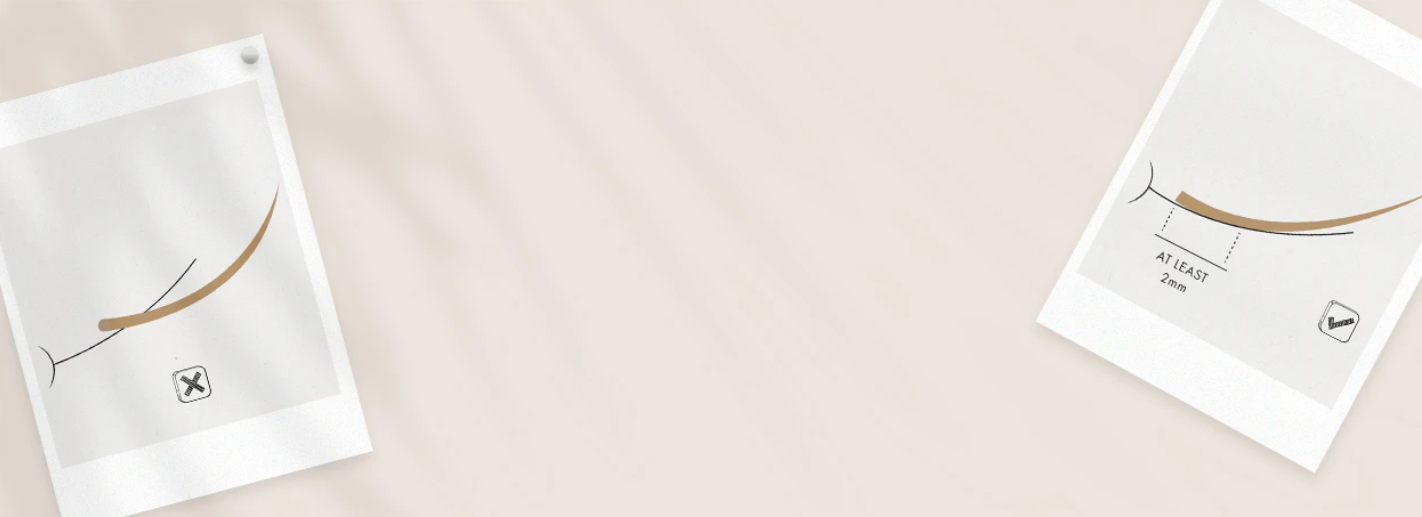

Table of Contents
Quick Tips & Tricks For Lash Placement | Our Trainer, Karolina Swiderska, Tells All
Lash placement can be tricky, especially for beginners who are only just entering the lash industry. Did you know that incorrect lash placement can actually affect your retention? Well, it does! Our lash trainer Karolina Swiderska is here to give you quick tips for achieving the best lash placement. If you’ve already perfected your eyelash extension placement but are still struggling with retention, we’ve got you covered! At London Lash, we have an abundance of helpful blogs that will guide you through the wondering world of lashing.
Correct vs Incorrect Lash Placement
Are you suffering from retention problems? Make sure your lash placement game is strong! Here’s a diagram that represents the placement of an individual lash extension on the natural lash.


As we mentioned above, if you are experiencing retention problems it could be because of a multitude of reasons, but one could be poor placement of the lash extensions.
Here are some top tips to help ensure that your lash placement is top-notch:
✅ It is important that when you place the lash extension, it should mirror the natural lash.
✅ Always check if the back has adhered properly to the natural lash, and that there is at least a 2 mm attachment point between the extension and the natural lash.
✅ The lash must not be placed too close to the lash line or else the lashes will irritate your client. Make sure that you place the lash no more, or no less, than 0.5 - 0.7 from the lash line.
✅ After following these steps, if you see that the attachment isn’t just right, remove the lash and place a new one correctly. There’s no shame in removing a lash if you believe it’s not attached correctly, if anything, your client will be grateful. By doing this, you will be saving your clients from discomfort caused by incorrectly attached lash extensions, and you’ll avoid those dreaded complaints from unhappy clients.

Correct Placement vs. Placement Mistakes
| Placement Factor | Correct Application Technique | Incorrect Application Hazard |
| Distance from Skin | Placed 0.5mm – 1mm away from eyelid margin | Touches eyelid skin (causes chemical burns & severe discomfort) |
| Base Attachment Point | Flush 1mm–2mm contact along the natural lash base | Lifted base / split base (catches on spoolies & causes early popping) |
| Directional Control | Placed straight at a 90° angle to the eyelid curve | Leaning or crisscrossing (weighs down natural hair & looks messy) |
| Glue Volume | Micro-droplet coat wrapping 1mm–2mm of the base | Large glue bead touching adjacent lashes (creates painful "stickies") |
There we have it! It’s important to remember that poor lash placement can result in a bad set of eyelash extensions which can cause irritation - and let us tell you, that’s the worst thing ever. No one wants irritated eyes, and not only will your lash retention be poor, but your client retention will also be too. Do you want to know more about retention? Our Top Retention Myths blog has all the answers you need…
Post prepared by London Lash Trainer, Karolina Swiderska @karolina_londonlashpro

Frequently Asked Questions (FAQ)
What are some tips for lash extension placement?
Ensure your extension sits 0.5mm to 1mm away from the eyelid skin (never touching the root). Place the base flush against the natural lash with a 1mm to 2mm seamless contact zone, and ensure the extension follows the natural directional angle of the client's eye.
Is C curl or D curl better for hooded eyes?
M curl, L curl, or C curl are generally better for hooded eyes than standard D curls. D curls can curve back toward the heavy eyelid skin, causing friction and discomfort. M and L curls feature a flat base that extends past the heavy lid before sweeping upward, opening up hooded eye shapes cleanly.
What's a good tip for a lash tech?
Never rush isolation! Taking two extra seconds to isolate a single natural lash cleanly prevents "stickies" (lashes glued together), which cause hair follicle traction, pain, and premature natural lash loss.
What are some tips for beginners who are looking for lash extension tips?
Start with classic 1:1 lash mapping before moving to volume fans, work in layers (taping up top layers to isolate lower rows), measure room temperature/humidity with a hygrometer, and adjust your glue choice to match your environment rather than forcing a glue that dries too quickly for your current speed.
Does heat affect lash extensions?
Yes. High temperatures cause lash glue to dry too fast during application, leading to weak bonds and quick shedding. For clients, extreme heat from ovens, hair dryers, or BBQs can singe synthetic lash tips or flatten the curl, while summer sweat and eyelid oils break down adhesive bonds if not cleansed daily.
Check out these featured products